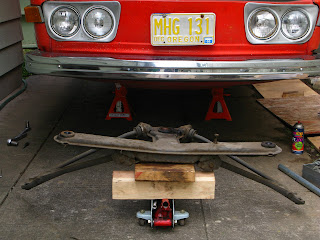
i realized that it was going to be so expensive to have all my front end bushings made by a machine shop that it made more sense to buy a mini-lathe and make them myself, so after weeks of research i drove to Harbor Freight and bought the 7x10 with a 20% off coupon for $320. not a bad price, but it comes with no tooling and requires extensive cleaning, modifications, and adjustments to make it accurate/reliable.
the machine comes in a cardboard box with a crude wooden crate held on with steel strapping. its mostly assembled, but is covered with a cosmolene-like red goo for corrosion resistance while it sits on a shelf somewhere. this crap is literally everywhere and is very sticky, so it must be removed. the easiest way would be to just bathe it in solvent, but i dont have a tank and didnt want a bunch of runoff, so i wiped every part clean by hand. it took half the day to do it, but it was also a good time to familiarize myself with how its all put together.
although it comes without any tooling, some accessories are included, like a set of change gears for threading, external jaws for the chuck, and a live center for the tailstock:
the first modification i did was to the studs that are used to attach the chuck to the spindle flange. it comes with three set screws instead of proper studs, and they weren't even long enough, so that if you threaded them all down tight inside the chuck body they wouldn't pass through the flange enough to use the nuts:
i found 6mm hardened studs of the right length at Wink's that have the thicker, unthreaded shank right where they pass through the flange, which makes for a tighter, more precise fit:
the next mod was kind of an accident...i broke the cheesy "glide plates" that are the bearing surface for the carriage on the ways by over-tightening them. i didnt realize how soft they were and one of them cracked:
as they come from the factory they use a system of set screws and cap screws to adjust for play, but the material is so soft that you end up with 3 tight spots where the cap screws are and 2 high spots where the set screws hold the plate away from the ways, and eventually (overnight for me) they crack from the strain:
my solution was to make my own from a special kind of plastic and use shims to precisely size each one. i used a material called HDPE, or high-density-polyethylene, which is similar to what those white plastic cutting boards are made of, so its hard with a slick surface. finding the right shims took quite a while, but eventually both sides were properly fitted and slop-free:
the tailstock (probably the cheesiest part on the whole machine) has a really poor "t" bolt to secure it to the ways that has a shitty habit of swiveling around to some random position every time you take it off, so i found a good spring at the hardware store that keeps it aligned when the tailstock is off. the securing nut is also hard to get at sometimes, so i replaced it with an extra tall coupling nut and a brinze thrust washer. i've found that i'm constantly removing and replacing it, so this works really well:
after at least a day or two of cleaning, adjusting, and tweaking, all cleaned up and ready to make some chips:
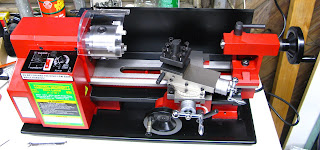
very quickly i became aware of how badly i needed some proper tooling...all i could really do at first was clamp something in the chuck and watch it spin. i was so anxious to start turning i went on kind of a spending spree at
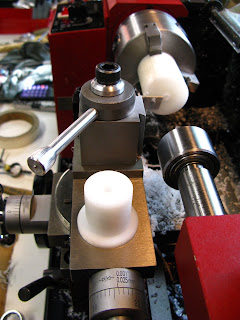
littlemachineshop.com, a website that specializes in parts & accessories for the 7" mini-lathes. not being one to dick around i went for the good stuff: A2Z quick change tool post, 5-piece indexable carbide-tipped turning tool set, 9-piece boring bar set, magnetic base dial indicator, 1/2" tailstock drill chuck, and a 5-piece center drill set. the QCTP is probably the most important upgrade, and worth every penny. without it, every tool change has to be set up with shims every time, a very tedious job. when i opened the box i couldnt believe how dainty it was, but it gets the job done. heres some of my first projects on top of the headstock with the QCTP and dial indicator in place:

the large aluminum rings in the middle are on a VW case bolt and are sized for pressing the crankshsft bearings on a an 80cc 2-stroke i'm working on, the white plastic is Delrin that i'm making the control arm bushings out of (theres one finished one on the far right) and the two aluminum rods on the left are a mandrel for turning a small Delrin disk and just something i was practicing on...
at first, the learning curve was really kicking my ass. i ruined several bushings and had to make so many trips to TAP plastics to replace the materials i was wasting they knew me as the "Delrin guy" and didnt even need to ask for another 6" rod. here's a typical days aftermath:
i also had considerable trouble getting the tailstock properly aligned... the adjustment for offset is really crude and the casting so soft that once tight, the head of the (tiny) bolt that secures the adjustment sinks in, leaving a deep witness mark. that means that a minor change to its position is impossible because under torque the bolt just returns to its crater. for this my bolt-salad-hoarding of the last 10+ years came in handy... i dont know exactly what it was for, but i had a small, slotted, rectangular washer that fit perfectly inside the recess and was thick enough to be rigid and hold its adjustment along with a shallow head cap screw:
theres also a set screw on the side of the base that forces the halves of the body apart, against the machined groove, so as to ensure its perpendicular to the ways. i replaced this with a standard bolt so its easier to tighten:
the last thing was to make my own center for the headstock to check alignment between centers. a simple (steep) taper can be made by setting the compound rest to some angle (30 in this case, for an included angle of 60) and using its feed wheel to make incremental passes across the face of the workpiece. i used cheapo 1/2" aluminum rod, so its not perfect, but close enough to check for any major mis-alignment:
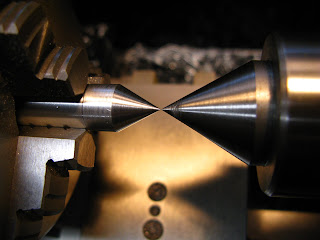
this is still giving me trouble. the latest thing i noticed is that its actually a little high; theres no adjustment for that, and as a result everything i turn when using the live center is tapered. its very subtle, but enough to affect a press-fit. the amount seems to vary randomly from .003 - .008" over an area of 3". i'm sure some of this is just in-borne imprecision (it is Harbor Freight, after all), but i've become obsessed with correcting it, and in an impressive display of tweaking-out i disassembled the headstock to measure eveything, convinced i would find some gross assembly error or something i could correct...in the end i didnt find much, just more red goo, some grit, and a couple fasteners that could have been tighter. i used my dial gauge to check runout everywhere, but it barely registered anything:

so its been a month since i bought it and i finally have all 4 control arm bushings, my idler arm bushing, both radius arm centering rings, a strut adaptor prototype, a new chain tensioner wheel for the derny, new shaft seals for its motor, and numerous mandrels & bearing press tools. right now the 412's subframe & control arms are being painted and will soon be ready for assembly... next post i'll show the control arm bushings, step by step (sort of)...


